Probiotics - Give Your Guts Some Goodness

probiotics the gut guide

Why Probiotics?


  • Your gut is home to between 500 and 2,000 species of bacteria, yeast, parasites, viruses and other micro-organisms

  • Our bodies have 10 times more microbes than human cells

  • Everything can affect the balance of the gut micro-flora from stress, sleep, antibiotics and prescription medicines, excess of food, undereating or malnutrition, highly processed foods, food preservatives and environment


  • Digestive diseases are common - from Irritable Bowel Syndrome to urinary tract disease, allergies to foods and yeast infections

  • Abs are made in the kitchen. Common imbalances in gut flora can lead to indigestion, bloating, fluid retention and gas

  • While you absolutely must consume probiotic-rich foods, stay active and have a plan in place to deal with stressful situations (counselling, friends to talk to, a regular meditation and yoga practice), I regularly take probiotic supplements to bolster my gut health (I highly recommend Restore Daily Probiotic from Nature's Way. There's also the Restore 100 Billion option.)


  • Chronic inflammation of the guts can erode the gut lining, leading to Leaky Gut (allowing vital nutrients and even food particles to leak from the gut, creating a toxic environment in the body)

  • Your gut bacteria produces vitamin B12 and K2, vital for energy, nervous system function and immunity 

  • Probiotics assist in balancing gut bacteria to outnumber the bad bacteria, yeast and fungi causing gut inflammation

  • Probiotics create enzymes that destroy harmful bacteria and stimulate the T-cells, responsible for immune system integrity


  • We naturally produce probiotics in the gut but lifestyle choices and disease can threaten their quality and quantity

  • A lack of probiotics can lead to digestive disorders, skin issues, yeast infections, vulnerability to colds and flus on a regular basis

  • Probiotics can prevent and treat urinary tract infections

  • Probiotics have been shown to improve and manage eczema in children


Epic Barre & Ballet Sculpt Moves

I recently gave my advice on the best barre moves to master - and the ones most often cheated in! Wellineux published a home workout guide and combined it with an XTend Barre giveaway. You can find the article on the Wellineux Blog.
Here are the moves and the reasons to do them. Don't belly flop.

Challenging and most importantly effective, these three moves are effective in developing body awareness, good core strength, muscular endurance, timing and postural alignment.
No belly flopping during the diamond push up! No dropping the hips while doing the bridge! Rather than cheat, you could try to make the moves smaller, or reduce the number of reps. Focus on perfect form if you are aiming for results.
The Diamond Push Up.Works: Triceps, shoulders, chest
Here’s how:
  1. From a kneeling position, make a triangle shape between your index fingers and thumbs. Place your hands, in this position, below the chest in a push up position. Engage the core muscles as you would in a plank hold.
  2. Try to maintain your head, neck and spine in alignment rather than dropping your head or straining your chin forward. Lower your chest towards your hands without letting the back arch and the belly slap the mat. This is belly flopping – don’t!
  3. Press hard into the palm of the hands as you raise back to your starting position, fully extending the arms. Repeat. As many as you can.
The Bridge with Heel CarveWorks: Hamstrings, glutes
Here’s how:
  1. Lie on your back with knees bent and feet flat on the mat. Ensure your feet are hip distance apart. Extend your arms, palms down by your sides.
  2. Tighten and engage your glutes then lift your hips up, feeling your abdominals also bracing gently to stabilise and support your spine.
  3. Keeping your hips lifted, extend your left heel along the mat as far as you can, then imagine carving the floor open with your heel as you drag it back. The foot is flexed to really target the hamstrings. Repeat with the right leg.
  4. Repeat until you need to rest, then gently roll down from the top of the spine until you’re back at the starting position.
The Lying Leg LiftWorks: Quadriceps, Abdominals
Here’s how:
  1. Lie on your back with knees bent and feet hip distance apart. Extend your arms, palms down, by your side.
  2. Extend your left leg to straight, flexing the foot as hard as you can. This is to engage the VMO (vastus medialis oblique) muscle – the quadricep muscle responsible for stabilising your kneecap. Turn the leg out to the side so that you have a slight external rotation.
  3. Make sure you are engaging the abdominals to avoid your back arching as you raise and lower the leg. You should feel this right through the front and sides of the tummy!
  4. Maintaining your foot in flexion and leg perfectly straight, raise the leg straight up – hold for a second – then lower your leg until it hovers just over the mat. Do this 10 – 20 times.
  5. Repeat this on the right side.

Fab Abs

I'm not going to spruik you bikini bodies or any of that crapola. The truth is, you need strong abs for life. They are essential in good posture, in maintaining your spine and hips and body in safe and optimum alignment for all activities (and at rest!).
The idea of "flat abs" is brilliant marketing, because it's not realistic for most people. That said, if you have a disproportionate amount of fat around the waistline, this can be a risk factor for diabetes, metabolic syndrome, PCOS and more.
No amount of planks or pilates will compensate if you are not eating well - that doesn't mean restriction and dieting (nasty cycle that will only make you feel awful!) but that you are aware of eating a decent serve of veggies (especially green), fruit (so many choices!), legumes, wholegrain carbs (love rye bread or wholegrain pasta) and lean protein (fish, skinless chicken, prawns, tofu).
This time of year it's tempting to overdo everything but try to keep your workout routine. Not just for the sake of your abs, but your sanity.
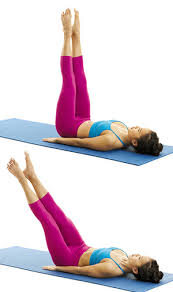
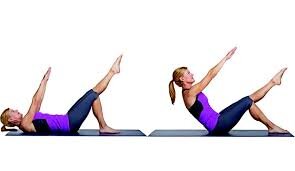
10 To 2
Lie on your back, pressing your whole spine into it. 
Slightly tuck the chin down to lengthen the neck and press the shoulders to the mat.
Raise both legs, pointing toes with a slight turn-out (like a mini plie) to the roof
Keeping legs pressed together, take them to the 10 o'clock position.
Centre, then direct legs to the 2 o'clock position.
Repeat x 10 each direction

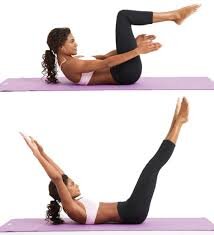
Double Leg Extension
Again, press spine into the mat firmly.
Curl the shoulders up away from the mat and lift the knees over the hips.
Inhale to extend the arms and legs as straight as you can.
Exhale to return knees over hips and arms reaching for toes.
Repeat x 10 - 15
Single Leg Teaser
Lie on your back, knees bent with heels aligned with hips. Raise one leg with thighs parallel.
Inhale to prepare and reach the arms up.
Exhale to curl the shoulders up away from the mat and reach for the toes of the raised leg.
Inhale to curl back down (don't drop!)
Repeat 8 on each side

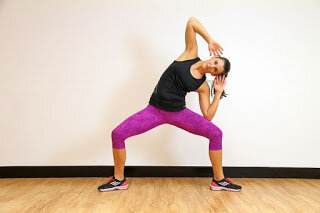
Plie with Elbow to Knee
Get into a wide plie position, making sure your knees are tracking toward your 2nd toe.
Knees aligned over the ankles.
Maintaining your lower body in perfect stillness, take fingertips to ears. 
Lower the elbow towards the knee then return to centre before reaching to other side.
Repeat 10 on each side

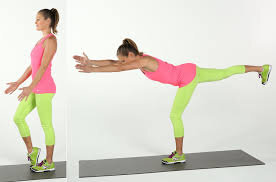
Single Leg Extension
Stand with feet hip distance apart.
Draw the belly button towards the spine and contract the shoulders to open the chest.
Maintaining the hips at the same level (don't hitch up on one side!), extend one leg back as you reach forward.
Hold for a count of 3.
Return to standing on one leg. 
Repeat 10 times each side
Beware: Don't twist at the hips! Think about maintaining the hip bones in the same direction at all times

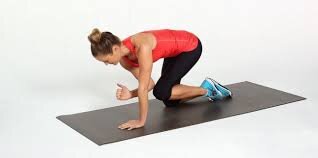
Tabletop Elbow To Knee
On your hands and knees, with wrists directly under shoulders and knees under hips.
Draw belly button to spine and avoid arching the back or rounding up.
Lengthen the back of the neck and direct the crown of the head forward.
Extend alternate arm and leg to make a long straight line.
Hold for 2 seconds then bring elbow to knee in the centre.
Repeat 10 times each side


10 Minute Booty Barre Workout

I love Tracey Mallett. An ex-dancer who has a whole range of barre DVDs and online training videos, she does fun and TOUGH workouts. You don't need to do an hour - you can feel a burn through the abs and thighs in this 10 minute workout. Maybe you do it once in the morning then again in the evening. Just an idea. Did you do it? Do you love it? Come and tell me on Facebook!